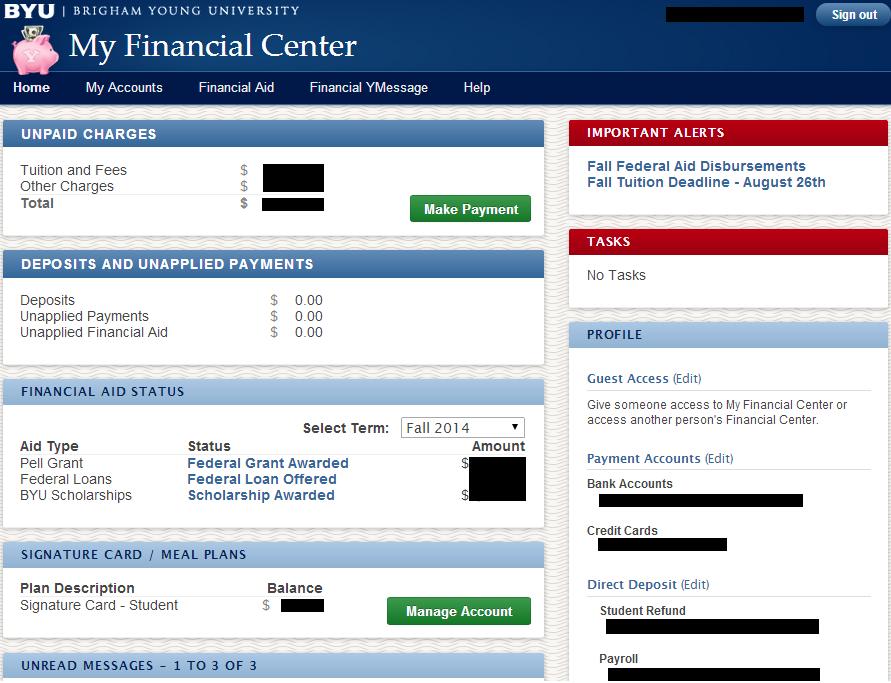
MyBYU is the section of the BYU website where you will have most of your online interaction with the university. To access it, go to my.byu.edu and then log on with your NetID and password.
- The MyBYU page is customizable. Click the ‘Customize’ button under the ‘Home’ tab, and you can add different elements to your MyBYU page to make it more useful. For instance, if you have an on-campus job, you can add the Y-Time app to the main page, which allows you to instantly see how many hours you’ve worked, sign in/out, or check your timecard for the pay period.
Campus Links
One of the default elements of the MyBYU main page is the ‘Campus Links’ box on the right-hand side of the screen. These links take you to various parts of the website and are extremely useful. Here are some of the more useful links:
Under the “Communication” Tab:
Under the “Communication” Tab:
- BYU Online Directory: allows you to search for BYU professors, staff, or students and provides contact information for them (if they have made it available to the public).
- Email Alias Manager: here, you can set up a byu.net or studentbody.byu.edu email alias (an email address that forwards mail to your regular email account). You can use this to make a more professional address to give professors/employers; you can also use it to get special deals that require a .edu email address (like a free trial of Amazon Student).
- Personal Information: this section of the website allows you to edit your contact information, your preferred name for class rolls, etc. (Remember to update your residential address every semester, or the university will charge you a fine!)
- Online Locker Rental: use this to reserve an on-campus locker. Many buildings have lockers which students can use to store books and supplies. It costs $10 to rent a locker for a semester
- Parking Registration: use this to register your vehicle with BYU, which allows you to park in the yellow Y-lots surrounding campus. (Parking in these lots, or any other BYU lots, without registration will get you a parking ticket.)
|
Under the “School” Tab:
|
|
Aim
AIM is a section of the BYU website which allows you to do a variety of useful things. To access AIM, log onto MyBYU (with your NetID and password), then under ‘Campus Links’ click on ‘AIM.’ Here are several useful things you can do on AIM:
- By clicking on ‘Advisement,’ you can access the GPA calculator. You can use this to see how getting certain grades will affect your cumulative GPA. This can be useful to help you see what grades you need to raise (or keep) your GPA.
- You can check your final exam schedule by clicking on ‘Class Schedule’ and then ‘My Final Exam Schedule’. However, keep in mind that this shows the university-assigned place and time for your class’ final, and your professor may modify that place/time.
- You can see all of the classes a professor is teaching during a given semester by clicking on ‘Class Schedule’ and then clicking on ‘Instructor Class Schedule’. Then enter a professor’s name and select the desired semester. This is particularly useful if you have a favorite professor and want to take more of his/her classes.
- By clicking on ‘Grades,’ you can access your unofficial academic transcript, which lists every class you’ve taken, your grades for each one, and your GPA for each semester as well as your cumulative GPA.
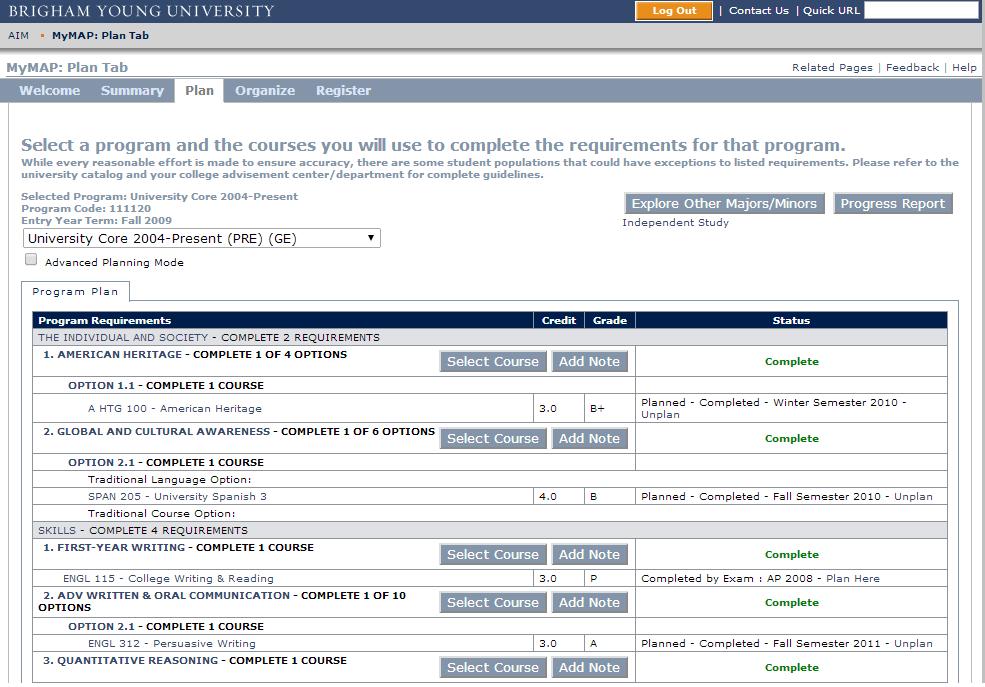
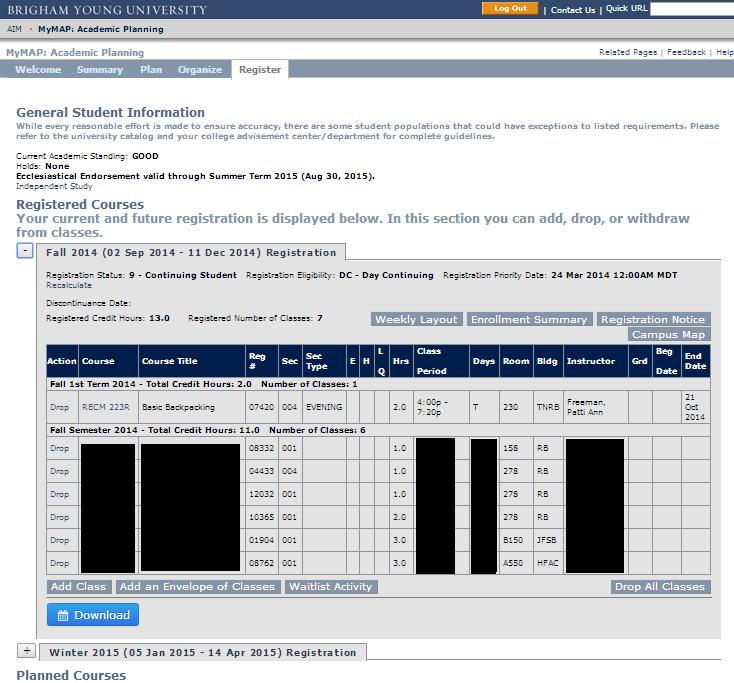
MyMap
This is where you can find information about the requirements for your general classes (GEs) and for your major/minor. You will also use this site to register for classes every semester. Here is an explanation of the different features:
|
The “Summary” Tab: This page shows your academic information (your major/minor, your academic standing, total credits you’ve taken, and your cumulative GPA). It also lists the location of and contact information for the advisement center associated with your major. The “Plan” Tab: This page is where you can see what classes you are required to take. The drop-down menu on the top left allows you to see the requirements for your GEs or for your major/minor. Each page is separated into the various requirements and you can click on “Select Course” to see which classes will fulfill that particular requirement. On the right hand side of the screen it will display whether you have completed a requirement or if it is still in-progress. On the top right of the screen you can “Explore Other Majors/Minors” which allows you to see the requirements for other programs and see if you have already taken any classes that would count towards another major/minor. The “Organize” Tab: You can take the classes that you have selected on the “Plan” page and organize them into different semesters-- essentially planning out when you would take each one and how to fit all of your requirements into your 4-year plan. (note: this is not a binding thing-- it’s just for your own organization and can be changed whenever) The “Register” Tab: This is where you will register for classes and can see your current (and future if you have already registered for an upcoming semester) schedule. It also shows you the date when you can register for the next semester's classes.
|
|
